


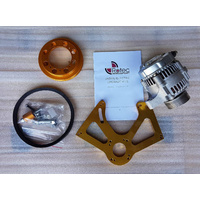
Jabiru tach sensor kit (Hall effect)
OSHKOSH FEATURE $250 | LIMITED | ENDS 26 JULY
Product Motivation and Setup
After ongoing frustration with the oversensitive and unreliable nature of the standard Jabiru tachometer sensor, Rotec decided to engineer a better solution.
The factory Jabiru sensor relies on an extremely tight air gap to two small flywheel tabs. In service this setup is prone to misalignment, inconsistent signal quality, and intermittent tach readings.
To solve this properly, Rotec has designed a far more reliable and simpler alternative using a Hall effect sensor. The Rotec assembly is a direct replacement for the original Jabiru sensor and mounts in the same location.
Instead of relying on flywheel tabs, the Rotec sensor reads the rotating flywheel magnets. Jabiru 2200 engines use two magnets, while Jabiru 3300 engines use three magnets. This produces a clean, stable signal that is far less sensitive to vibration or minor alignment changes.
The air gap between the Rotec sensor and the flywheel magnets is not critical. Any gap between 1 mm and 5 mm will operate reliably, with approximately 2 mm being ideal. A convenient M6 grub screw located at the end of the sensor is used to adjust the sensor clearance relative to the flywheel magnets.
Tachometer Compatibility and Wiring
The Rotec tach sensor can output pulses suitable for virtually any tachometer, including modern glass panel systems.
Connection to the standard Jabiru 0 to 4000 RPM VDO tachometer is especially simple:
-
Red wire to VDO tach pin 3 (12V positive)
-
Black wire to VDO tach pin 4 (ground)
-
White wire to VDO tach pin 8 (signal input)
No additional conditioning or adapters are required.
Calibration
The tachometer pulse rate must be set correctly for the number of magnets on the flywheel.
VDO Calibration Method
On the rear of the VDO tachometer, at approximately the 6 o’clock position, there is a small 3 mm access hole. This hole provides access to the calibration button.
- Using a match stick or similar tool, press and hold the button marked “A” (see figure) while powering up the tachometer.
- The display will show PULSE. Release the button but keep the tool ready for further presses.
- After a few seconds, each digit of the pulse rate selector will begin flashing on the LCD display. While a digit is flashing, pressing the button will cycle through the available numbers.
- When the button is released, the next digit will flash, allowing it to be adjusted in the same way.
- Using this method, set the pulse rate to three pulses per revolution for the Jabiru 3300, or two pulses per revolution for the Jabiru 2200.
- Once the correct value is set, leave the unit powered on for a few seconds. The display will automatically revert back to the Hobbs hours screen.
Included
- Tach sensor assembly, with adjustable sensor post
- Wire pigtail and three pin JR plug
- M6 mounting bolt and machined clamping washer
(221)
| SKU | 221 |
| Shipping Weight | 0.5000kg |
Be The First To Review This Product!
Help other Rotec Aerosport users shop smarter by writing reviews for products you have purchased.


